Thursday, December 22, 2011

Easy Tuscan Pasta with Tomato-Basil Cream

Super simple meal that takes only as long as it takes to cook the ravioli.


TUSCAN PASTA WITH TOMATO BASIL CREAM
1 (20-oz.) package refrigerated four-cheese ravioli
1 (16-oz.) jar sun-dried tomato Alfredo sauce (I use "Bertolli's Four Cheese Rosa" and it's fantastic)
2 medium-size fresh tomatoes, chopped
1 Tbs basil*
1/3 cup grated Parmesan cheese

1. Prepare pasta according to package directions.

2. Meanwhile, pour Alfredo sauce into a medium saucepan. Stir in chopped tomatoes and basil, and cook over medium-low heat 5 minutes or until thoroughly heated. Toss with pasta, and top evenly with 1/3 cup grated Parmesan cheese**. Garnish, if desired.

*You can use 1/2 cup of fresh basil

**I added the parmesan cheese to the sauce and stirred it in before tossing it with the pasta.

Tuesday, December 20, 2011

Heating Pad Covers

I've seen a lot of how to's on making heating pads but nothing on anything to cover them. I've heard that if they get wet, they're basically ruined because the rice/wheat in them will start to mold. Ewwww! I had an idea a little while ago to make a heating pad for a little boy who has cancer. His actual request was to have drawings of dinosaurs, bugs, and fish. Since I don't draw, I thought I'd make a heating pad in the shape of a dinosaur or a fish. Something cool like that. Well, remember my first post with those sad looking heart heating pads? Well, I was determined to do better. And by better, make it simpler! So instead of trying to cut out dinosaur shapes and fill it with rice, I thought, simple rectangular heating pad covered by fabric that has his "animals" on it. I went over to Joann's and was surprised to find that I could not find any kind of fabric that I was looking for! I went online and found quite a few from Joann's so I bought it. It said it'd take over a week to get here. So today was the day it finally came!! I was so excited I made my heating pad and covers all today. I decided to make 3 covers. That way, if he liked one in particular or if the fleece doesn't work, they can switch it out. I also thought that little kids get things messy! So, if he spills anything on it, they can just throw the cover in the wash and hope it didn't get on the actual heating pad.
I LOVED the fabrics! I went with 2 fleece and 1 flannel. I fell in love with the bugs! I'm not exactly sure why but I wanted to hoard the whole yard to myself!!
Isn't it just darling?
The blue dinosaur was better in person. I loved this one too.
And I think these are just too fun! This is the flannel if you can't already tell!
All together now!
So, since there are NO patterns for covers, I just sorta made it up as I went along. Tell me, do they look like my 4 year old made them? They definitely look homemade but hey, at least I'm trying and that's the goal, right? :) I'm hoping this little boy will love at least 1 of them!

Move It, Move It, Exercise!

I actually found this website from another friend's blog (http://projectgranolamom.com/). I did this workout today:


http://www.bodyrock.tv/2009/10/31/happy-halloween-workout-october-31-2009/

Look how high she's jumping! I, however, did not jump as high as she did. Maybe the first couple times. Good stuff. It took me probably about 20 minutes. I was cooking breakfast in between so I had longer rest periods. The 20 minutes did not include those resting times. I felt it almost everywhere! My legs were killing me on the jumps and lunges and my abs were on fire! My hamstrings were a little wobbly (can hamstrings even be wobbly??) too. Don't go up the stairs right after this workout! :) Now if only I could get the motivation to do this everyday! Try it out! You will not be disappointed.

Monday, December 19, 2011

Chocolate Chip Cookie Cheesecake Bars

Source: brandysbaking.blogspot.com via Tiffany on Pinterest


I like cookies, and I like Cheesecake so this recipe looked really good to me! My stuff never looks as good as the stuff does on Pinterest though. Next time I'm adding caramel on top too. :)

CHOCOLATE CHIP COOKIE CHEESECAKE BARS

Ingredients:
Crust:
1 1/2 cups graham cracker crumbs
5 tablespoons unsalted butter, melted

Chocolate Chip Cook Dough:
5 tablspoons unsalted butter, room temperature
1/3 cup packed light brown sugar
3 tablespoons granulated sugar
1/4 teaspoon salt
1 teaspoon pure vanilla extract
3/4 cup flour
2/3 cup chocolate chips

Cheesecake Filling:
10 oz cream cheese, room temperature
1/4 cup sugar
1 large egg, room temperature
1 teaspoon pure vanilla extract

Directions:
1. Preheat the oven to 325 F.
2. Mix the melted butter and graham cracker crumbs until thoroughly combined. Press the mixture into the bottom of the prepared pan. Bake in preheated oven for 6 minutes. Remove pan to a cooling rack. Keep the oven on.
3. While the crust is cooling, prepare the chocolate chip cookie dough. In the bowl of a stand mixer fitted with the paddle attachment or in a large bowl with an electric mixer, beat butter, brown sugar, granulated sugar, salt and vanilla until smooth and thoroughly combined, about 1 minute. Mix in the flour on low speed, and mix until just incorporated. Mix in the chocolate chips. Set aside.
4. In the bowl of a stand mixer fitted with the paddle attachment or in a large bowl with an electric mixer cream together the cream cheese and sugar until smooth. Mix in the egg and vanilla on low speed just until incorporated. Pour the cheesecake batter into the prepared crust. Using your hand to form clumps, distribute the cookie dough on to the top of the cheesecake batter in teaspoon-sized clumps. Be sure to use all of the dough.
5. Bake for about 30 minutes, until the top feels dry and firm (the cookie dough) and the entire pan looks set if given a gentle shake. Move bars to a cooling rack and allow to cool completely. Chill in refrigerator overnight or for at least a couple hours.

*The only difference I'm going to make next time is adding a little sugar to the crust.

Sunday, December 18, 2011

Honey Lime Chicken Enchiladas

Yummy yummy! These have become our new go to enchiladas. They are so good and you can make them as spicy as you want which is good with kids. Here's the Pinterest picture:


And here's my picture. The picture doesn't do it justice!! They are so good!
HONEY LIME CHICKEN ENCHILADAS
Modified from: Favorite Family Recipes (http://www.favfamilyrecipes.com/)
1 small, onion, peeled & diced (use a sweet onion if you can find it)*
2 chicken breast halves
1/2 c. chicken broth
1/2 Tbsp. chili powder (double if you like it spicy)
1 tsp. garlic, minced (2-3 cloves)
salt & pepper (to taste)
2 tablespoons honey
3 tablespoons lime juice (1 large lime)
8-10 flour tortillas
1 lb. Monterey jack cheese (Mozzarella), shredded**
16 ounces green chile enchilada sauce (I like Macayo brand)
1/2 c. heavy cream

Saute onion in a little butter until it becomes transparent and soft. In a crock pot*** add chicken, chicken broth, sauteed onion, chili powder, garlic, and salt & pepper. Cook on low for about 8 hours (or high for 3-4) adding more broth if needed (you don't want it to cook out completely). Remove chicken from crock pot and shred, then return to crock pot and simmer another 5 min. Drain out some of the juices (but not all of it... keep about 1/4 c.) and add honey and lime (the original recipe have way more honey and lime in it and I found I liked it way better with less. This recipe represents those changes I made). Place seasoned, shredded chicken in a Ziploc bag and seal tightly, pressing out as much air as you can. Marinate at least 30-40 minutes.. longer if you can (I did about an hour). While chicken is marinating spray a 9x13 pan with cooking spray, then pour about 1/2 c. of enchilada sauce over the bottom. Fill tortillas with chicken mixture and shredded cheese, saving about 1 c. of cheese to sprinkle on top of enchiladas. Mix the remaining enchilada sauce with heavy cream. Pour sauce on top of the enchiladas and sprinkle with cheese. Bake at 350 degrees for 30 minutes until brown and crispy on top. Enjoy! You'll love them!

*I have omitted the onion it completely when I forgot to buy one and it tasted fine.
**I have used just mozzarella and a mix of monterey jack and mozzarella.
*If you don't have a crock-pot, just boil chicken in the same ingredients in a large pot with a little extra chicken broth until cooked through and can shred. I've done it both ways and they turn out great.

Friday, December 16, 2011

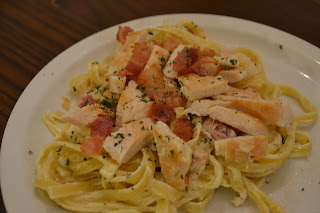
Chicken Bacon Pasta

This is a little more up my alley! I can cook much better than I can sew. I saw this today on of course, none other than Pinterest.


I had all the ingredients, it wasn't hard to make, and it didn't take that long! Perfect meal!

Chicken Bacon Pasta inspired byTasty Kitchen (Printable Recipe)

Ingredients:
1/2 pound bacon, cooked and roughly chopped
1/2 tsp crushed red pepper flakes (I didn't use any)
1 tsp garlic powder
1/2 pound penne pasta
1/2 cup heavy cream
1/4 cup cream cheese
1/4 cup grated parmesan cheese
2 whole eggs
1/4 tsp ground black pepper
2 grilled chicken breast, sliced (since it's freezing outside, I just cooked mine on a pan on the stove)

Directions:
Cook the pasta in boiling salted water until done (according to package instructions). Place cream and cream cheese in a small saucepan. Heat over low until cream cheese is melted, and whisk until smooth. Remove from heat. Add the parmesan cheese, eggs, garlic powder, red pepper flakes and pepper and whisk until blended. Drain pasta (reserving 1/2 cup of hot water) and return to pot. Immediately add the white sauce and toss to coat. The hot pasta will cook the eggs. Stir in the bacon, and add some reserved pasta water to loosen the sauce. Top with grilled chicken.

Sunday, December 4, 2011

Cold & Hot Comfort Bags

My first attempt at a craft in a while. I saw these cold & hot comfort bags (basically a rice filled bag) through this pin:


Although, when I clicked on this pin, there were so many ideas. I pinned the one I wanted to do which was cold & Hot Comfort Bags from here:


So I set out to make my own. On the Skip To My Lou website, she had made these bags into cute shapes for kids! I love that idea! I decided that making a couple heart sacks would be cute and easy. She has an easy description of how she did it and I made just a couple changes to it.

1) I cut out my pattern and I actually cut the fabric about 1/4' bigger than the pattern. I just did that because I wanted the final shape to be about the size of my pattern.
2) Here's my cut out of my second heart with right sides showing.
3) I sewed about 1/4' around the heart with right sides together. I left about an inch gap so I could turn them inside out. You can't see the seams that well in these pictures. Maybe I should've taken the picture a little closer.
4) Instead of cutting notches and slits, I got out my pinking shears and cut as close to the seam as I could without actually cutting it!
5) I turned it right side out (which was the hardest part) and then sewed about 1/4' all around the outside except for that 1' hole.
6) I filled it up with rice and then sewed the 1' hole closed. There aren't any pictures of filling it up for rice because I needed both hands. Here is a pic of the final product. I'm not sure if I'd sew the 1/4' as an outline again. It didn't turn out exactly as I wanted but they still look good enough.
I stuck mine in the freezer and wahlah! A cold pack!

The Pinterest Conundrum

As I've been cruising around on Pinterest (a lot) it's really hard to finally set the computer down and try some of projects that I've pinned. So I've decided that I'm going to make/cook/do some of the projects that I've pinned and post them here. I'm hoping that this will motivate me to actually do the stuff that I'm pinning! I'm not in the least that super crafty so we'll see how this all works out!